The post Starting of Tomcat failed Hatasının Çözümü first appeared on Emre Bektaş.
]]>Tomcat dizininden bin klasörünün içinden catalina.bat dosyasını notepad yardımı ile açınız,
Daha sonrasında şu 2 satırı bulunuz;
:noJuliConfig
set “JAVA_OPTS=%JAVA_OPTS% %LOGGING_CONFIG%”:noJuliManager
set “JAVA_OPTS=%JAVA_OPTS% %LOGGING_MANAGER%”
bu satırlardaki çift tırnakları kaldırınız. Yani kod şu şekilde olmalı;
:noJuliConfig
set JAVA_OPTS=%JAVA_OPTS% %LOGGING_CONFIG%:noJuliManager
set JAVA_OPTS=%JAVA_OPTS% %LOGGING_MANAGER%
Bu değişiklikten sonra dosyayı kaydedip Netbeans’dan server’ı başlatmayı deneyebilirsiniz…
The post Starting of Tomcat failed Hatasının Çözümü first appeared on Emre Bektaş.
]]>Umarım sizinde bir yerlerde işinize yarar 
package ise401;
import java.io.BufferedReader;
import java.io.FileReader;
import java.io.IOException;
/**
 *
 * @author Emre Bektas
 */
public class Ise401 {
    public static void main(String[] args) {
        String alldata="";
        int i =1;
        int counter =0;
        while(i<=50){
        try (BufferedReader br = new BufferedReader(new FileReader("C:\\Users\\Emre Bektas\\Desktop\\Obama\\Haber\\"+i+".txt")))
		{
			String sCurrentLine;

			while ((sCurrentLine = br.readLine()) != null) {
                            counter++;
                            alldata+=sCurrentLine;
                            alldata+=" ";
			}

		} catch (IOException e) {
			e.printStackTrace();
		}
        i++;
        }
        System.out.println("Number of sentence: " + counter);
        System.out.println("Number of word: " +countWord(alldata));

    }
   static int countWord(String alldata){
        String[] wordArray = alldata.split("\\s+");
        int countword = wordArray.length;
        return countword;
    }
}
The post Java ile Dökümandaki Cümle ve Kelimeleri Saydırma first appeared on Emre Bektaş.
]]>The post Java ile TCP-UDP Server/Client Uygulamaları first appeared on Emre Bektaş.
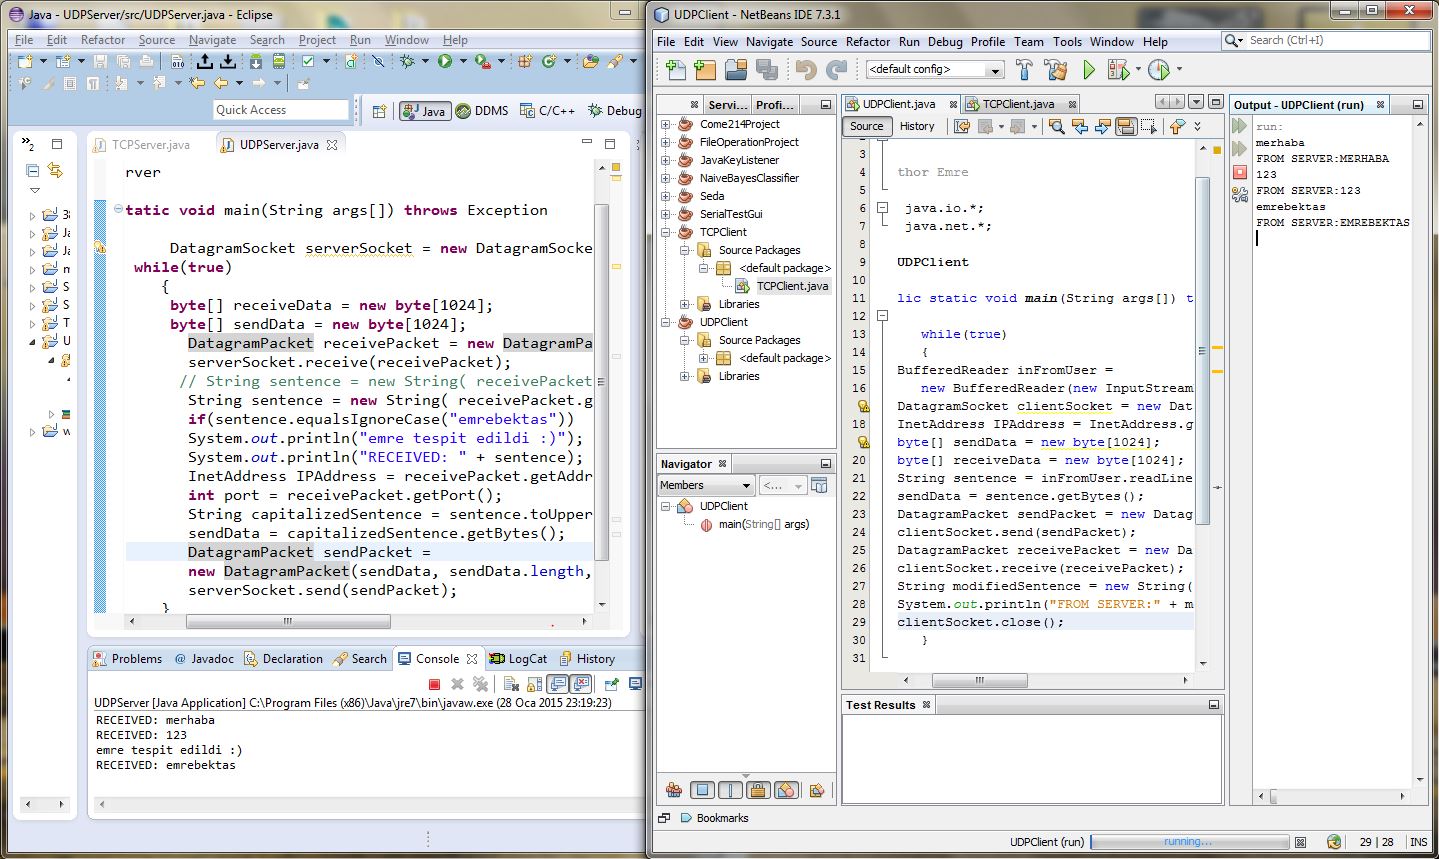
]]>TCP server/client dosyası ve UDP server/client java dosyalarını kodlarda belirttim. Ek olarak benim eklediğim bir bölüm var.
Benim amacım linux üzerinden bir server kurup örneğin robotu kontrol etmek ve robottan gelen verileri kod içerisinde yorumlamaktı. Örnek olarak sizlere .equals komutunu göstereceğim.
UDP Server.java dosyasında bulunana sentenceyi direkt olarak kullanamıyoruz. Eğer clienttan emre komutunu yollarsak
stringin boyutu 1024(byte[] dizisinin boyutu) oluyor. Bizim bunu indirgememiz gerekiyor ki gelen veriyi yakalayabilelim.
// olan satısı kaldırıp diğerlerini eklerseniz işlem tamam oluyor. clientden emrebektas gönderirsem emre tespit edildi
şeklinde output vermesi gerekiyor.Tekrarlamış oluyorum ama bu değişikliği yapmayıp sentence.equalsIgnoreCase(“emrebektas”) yazarsanız emrebektas’ı yakalayamazsınız. çünkü emrebektas’ın uzunluğu 10 iken sentence uzunluğu 1024.
// String sentence = new String( receivePacket.getData());
String sentence = new String( receivePacket.getData(),0,receivePacket.getLength(),"UTF-8");
if(sentence.equalsIgnoreCase("emrebektas"))
System.out.println("emre tespit edildi :)");
System.out.println("RECEIVED: " + sentence);
Örnek olması amacıyla makalenin sonunda UDP server/client uygulama örneği ekledim.
TCPServer.java
import java.io.*;
import java.net.*;

class TCPServer
{
   public static void main(String argv[]) throws Exception
      {
         String clientSentence;
         String capitalizedSentence;
         ServerSocket welcomeSocket = new ServerSocket(6789);

         while(true)
         {
            Socket connectionSocket = welcomeSocket.accept();
            BufferedReader inFromClient =
               new BufferedReader(new InputStreamReader(connectionSocket.getInputStream()));
            DataOutputStream outToClient = new DataOutputStream(connectionSocket.getOutputStream());
            clientSentence = inFromClient.readLine();
            System.out.println("Received: " + clientSentence);
            capitalizedSentence = clientSentence.toUpperCase() + '\n';
            outToClient.writeBytes(capitalizedSentence);
         }
      }
}
TCPClient.java
import java.io.*;
import java.net.*;

class TCPClient
{
 public static void main(String argv[]) throws Exception
 {
  String sentence;
  String modifiedSentence;
  BufferedReader inFromUser = new BufferedReader( new InputStreamReader(System.in));
  Socket clientSocket = new Socket("localhost", 6789);
  DataOutputStream outToServer = new DataOutputStream(clientSocket.getOutputStream());
  BufferedReader inFromServer = new BufferedReader(new InputStreamReader(clientSocket.getInputStream()));
  sentence = inFromUser.readLine();
  outToServer.writeBytes(sentence + '\n');
  modifiedSentence = inFromServer.readLine();
  System.out.println("FROM SERVER: " + modifiedSentence);
  clientSocket.close();
 }
}
UDPServer.java
import java.io.*;
import java.net.*;

class UDPServer
{
   public static void main(String args[]) throws Exception
      {
         DatagramSocket serverSocket = new DatagramSocket(9876);
            byte[] receiveData = new byte[1024];
            byte[] sendData = new byte[1024];
            while(true)
               {
                  DatagramPacket receivePacket = new DatagramPacket(receiveData, receiveData.length);
                  serverSocket.receive(receivePacket);
                  String sentence = new String( receivePacket.getData());
                  System.out.println("RECEIVED: " + sentence);
                  InetAddress IPAddress = receivePacket.getAddress();
                  int port = receivePacket.getPort();
                  String capitalizedSentence = sentence.toUpperCase();
                  sendData = capitalizedSentence.getBytes();
                  DatagramPacket sendPacket =
                  new DatagramPacket(sendData, sendData.length, IPAddress, port);
                  serverSocket.send(sendPacket);
               }
      }
}
UDPClient.java
import java.io.*;
import java.net.*;

class UDPClient
{
   public static void main(String args[]) throws Exception
   {
      BufferedReader inFromUser =
         new BufferedReader(new InputStreamReader(System.in));
      DatagramSocket clientSocket = new DatagramSocket();
      InetAddress IPAddress = InetAddress.getByName("localhost");
      byte[] sendData = new byte[1024];
      byte[] receiveData = new byte[1024];
      String sentence = inFromUser.readLine();
      sendData = sentence.getBytes();
      DatagramPacket sendPacket = new DatagramPacket(sendData, sendData.length, IPAddress, 9876);
      clientSocket.send(sendPacket);
      DatagramPacket receivePacket = new DatagramPacket(receiveData, receiveData.length);
      clientSocket.receive(receivePacket);
      String modifiedSentence = new String(receivePacket.getData());
      System.out.println("FROM SERVER:" + modifiedSentence);
      clientSocket.close();
   }
}
Örnek Program;
Kaynak: Computer Networking: A Top Down Approach, by Kurose and Ross
The post Java ile TCP-UDP Server/Client Uygulamaları first appeared on Emre Bektaş.
]]>The post Java Veritabanı Projesi – Java ile Veritabanı Bağlantısı first appeared on Emre Bektaş.
]]>Programda JFrame kullanılmıştır. Veritabanına kişi eklemek eklenen kişiyi silmek ve kişinin bilgilerini güncellemek bu program ile mümkündür. Eklenen herbir kişi Jtable’da görünmektedir. Aynı şekilde herhangi bir güncelleme veya kişi silme işleminin ardından Jtable güncellecektir. Jtable’a veri gönderirken net.proteanit.sql.DbUtils; kütüphanesini kullandım. kullanımı ise
DbUtils.resultSetToTableModel(resultset) result sette sizin sql sonucunuz tutulmuş olması gerekiyor. örneğin: resultset = command.executeQuery(“select * from people”); bu komutta people tablosundaki bütün bilgiler resultset’e kopyalandı ve DbUtils.resultSetToTableModel(resultset) komutu ile birnevi bu querynin outputunu Jtable’a aktarmış oluyoruz. İşimizi oldukça kolaylaştıran bir kütüphane olduğunu söyleyebilirim.
import java.sql.Connection;
import java.sql.DriverManager;
import java.sql.PreparedStatement;
import java.sql.ResultSet;
import java.sql.ResultSetMetaData;
import java.sql.SQLException;
import java.sql.Statement;
import java.util.Vector;
import java.util.logging.Level;
import java.util.logging.Logger;
import javax.swing.ComboBoxModel;
import javax.swing.DefaultComboBoxModel;
import javax.swing.DefaultListModel;
import javax.swing.JOptionPane;
import javax.swing.JTable;

import net.proteanit.sql.DbUtils;

/**
 *
 * @author Emre Bektas
 */

public class DbProjectGui extends javax.swing.JFrame {
  protected Connection conn = null; //Bağlantı nesnemiz
    protected Statement command = null;// Komut nesnemiz
    protected String url = "jdbc:mysql://localhost:3306/";//veritabanının adresi ve portu
    protected String dbName = "test"; //veritabanının ismi
    protected String driver = "com.mysql.jdbc.Driver";//MySQL-Java bağlantısını sağlayan JDBC sürücüsü
    protected String userName = "root"; //veritabanı için kullanıcı adı
    protected String password = ""; //kullanıcı şifresi
    protected ResultSet res; // sorgulardan dönecek kayıtlar (sonuç kümesi) bu nesne içerisinde tutulacak
    private PreparedStatement Statement1;
    /**
     * Creates new form DbProjectGui
     */
    public DbProjectGui() {
        initComponents();
    }
private void baglantiAc() throws Exception {

        Class.forName(driver).newInstance();
        conn = DriverManager.getConnection(url + dbName, userName, password);//bağlantı açılıyor
        command = conn.createStatement();
    }
    @SuppressWarnings("unchecked")
    // <editor-fold defaultstate="collapsed" desc="Generated Code">//GEN-BEGIN:initComponents
    private void initComponents() {

        jScrollPane1 = new javax.swing.JScrollPane();
        jTable1 = new javax.swing.JTable();
        jLabel2 = new javax.swing.JLabel();
        jLabel3 = new javax.swing.JLabel();
        jLabel4 = new javax.swing.JLabel();
        jLabel5 = new javax.swing.JLabel();
        jTextFieldName = new javax.swing.JTextField();
        jTextFieldLName = new javax.swing.JTextField();
        jTextFieldAge = new javax.swing.JTextField();
        jButtonFetchData = new javax.swing.JButton();
        jButtonInsert = new javax.swing.JButton();
        jButton2Update = new javax.swing.JButton();
        jButtonDelete = new javax.swing.JButton();
        jComboBox1 = new javax.swing.JComboBox();

        setDefaultCloseOperation(javax.swing.WindowConstants.EXIT_ON_CLOSE);

        jTable1.setModel(new javax.swing.table.DefaultTableModel(
            new Object [][] {
                {null, null, null, null},
                {null, null, null, null},
                {null, null, null, null},
                {null, null, null, null}
            },
            new String [] {
                "Title 1", "Title 2", "Title 3", "Title 4"
            }
        ));
        jTable1.addMouseListener(new java.awt.event.MouseAdapter() {
            public void mouseClicked(java.awt.event.MouseEvent evt) {
                jTable1MouseClicked(evt);
            }
        });
        jScrollPane1.setViewportView(jTable1);

        jLabel2.setText("Name:");

        jLabel3.setText("LName:");

        jLabel4.setText("Age:");

        jLabel5.setText("Sex:");

        jTextFieldLName.setToolTipText("");

        jButtonFetchData.setText("Fetch Data");
        jButtonFetchData.addActionListener(new java.awt.event.ActionListener() {
            public void actionPerformed(java.awt.event.ActionEvent evt) {
                jButtonFetchDataActionPerformed(evt);
            }
        });

        jButtonInsert.setText("Insert");
        jButtonInsert.addActionListener(new java.awt.event.ActionListener() {
            public void actionPerformed(java.awt.event.ActionEvent evt) {
                jButtonInsertActionPerformed(evt);
            }
        });

        jButton2Update.setText("Update");
        jButton2Update.addActionListener(new java.awt.event.ActionListener() {
            public void actionPerformed(java.awt.event.ActionEvent evt) {
                jButton2UpdateActionPerformed(evt);
            }
        });

        jButtonDelete.setText("Delete");
        jButtonDelete.addActionListener(new java.awt.event.ActionListener() {
            public void actionPerformed(java.awt.event.ActionEvent evt) {
                jButtonDeleteActionPerformed(evt);
            }
        });

        jComboBox1.setModel(new javax.swing.DefaultComboBoxModel(new String[] { "Male", "Female" }));

        javax.swing.GroupLayout layout = new javax.swing.GroupLayout(getContentPane());
        getContentPane().setLayout(layout);
        layout.setHorizontalGroup(
            layout.createParallelGroup(javax.swing.GroupLayout.Alignment.LEADING)
            .addGroup(layout.createSequentialGroup()
                .addContainerGap(javax.swing.GroupLayout.DEFAULT_SIZE, Short.MAX_VALUE)
                .addGroup(layout.createParallelGroup(javax.swing.GroupLayout.Alignment.LEADING, false)
                    .addGroup(javax.swing.GroupLayout.Alignment.TRAILING, layout.createSequentialGroup()
                        .addGroup(layout.createParallelGroup(javax.swing.GroupLayout.Alignment.LEADING)
                            .addGroup(layout.createParallelGroup(javax.swing.GroupLayout.Alignment.LEADING, false)
                                .addGroup(layout.createSequentialGroup()
                                    .addComponent(jLabel2)
                                    .addPreferredGap(javax.swing.LayoutStyle.ComponentPlacement.UNRELATED)
                                    .addComponent(jTextFieldName, javax.swing.GroupLayout.PREFERRED_SIZE, 80, javax.swing.GroupLayout.PREFERRED_SIZE))
                                .addGroup(layout.createSequentialGroup()
                                    .addGroup(layout.createParallelGroup(javax.swing.GroupLayout.Alignment.LEADING)
                                        .addComponent(jLabel4)
                                        .addComponent(jLabel3))
                                    .addPreferredGap(javax.swing.LayoutStyle.ComponentPlacement.RELATED)
                                    .addGroup(layout.createParallelGroup(javax.swing.GroupLayout.Alignment.LEADING)
                                        .addComponent(jTextFieldLName)
                                        .addComponent(jTextFieldAge))))
                            .addGroup(layout.createSequentialGroup()
                                .addComponent(jLabel5)
                                .addGap(18, 18, 18)
                                .addComponent(jComboBox1, javax.swing.GroupLayout.PREFERRED_SIZE, javax.swing.GroupLayout.DEFAULT_SIZE, javax.swing.GroupLayout.PREFERRED_SIZE)))
                        .addPreferredGap(javax.swing.LayoutStyle.ComponentPlacement.RELATED, javax.swing.GroupLayout.DEFAULT_SIZE, Short.MAX_VALUE)
                        .addGroup(layout.createParallelGroup(javax.swing.GroupLayout.Alignment.LEADING)
                            .addComponent(jButton2Update, javax.swing.GroupLayout.Alignment.TRAILING)
                            .addComponent(jButtonInsert)
                            .addComponent(jButtonDelete)))
                    .addComponent(jScrollPane1, javax.swing.GroupLayout.Alignment.TRAILING, javax.swing.GroupLayout.PREFERRED_SIZE, 452, javax.swing.GroupLayout.PREFERRED_SIZE))
                .addGap(66, 66, 66)
                .addComponent(jButtonFetchData)
                .addContainerGap(71, Short.MAX_VALUE))
        );
        layout.setVerticalGroup(
            layout.createParallelGroup(javax.swing.GroupLayout.Alignment.LEADING)
            .addGroup(layout.createSequentialGroup()
                .addContainerGap()
                .addGroup(layout.createParallelGroup(javax.swing.GroupLayout.Alignment.LEADING)
                    .addComponent(jScrollPane1, javax.swing.GroupLayout.PREFERRED_SIZE, 183, javax.swing.GroupLayout.PREFERRED_SIZE)
                    .addComponent(jButtonFetchData))
                .addGap(11, 11, 11)
                .addGroup(layout.createParallelGroup(javax.swing.GroupLayout.Alignment.LEADING)
                    .addGroup(layout.createSequentialGroup()
                        .addComponent(jButtonInsert)
                        .addPreferredGap(javax.swing.LayoutStyle.ComponentPlacement.RELATED)
                        .addComponent(jButton2Update)
                        .addPreferredGap(javax.swing.LayoutStyle.ComponentPlacement.RELATED)
                        .addComponent(jButtonDelete))
                    .addGroup(layout.createSequentialGroup()
                        .addGroup(layout.createParallelGroup(javax.swing.GroupLayout.Alignment.BASELINE)
                            .addComponent(jLabel2)
                            .addComponent(jTextFieldName, javax.swing.GroupLayout.PREFERRED_SIZE, javax.swing.GroupLayout.DEFAULT_SIZE, javax.swing.GroupLayout.PREFERRED_SIZE))
                        .addPreferredGap(javax.swing.LayoutStyle.ComponentPlacement.RELATED)
                        .addGroup(layout.createParallelGroup(javax.swing.GroupLayout.Alignment.BASELINE)
                            .addComponent(jLabel3)
                            .addComponent(jTextFieldLName, javax.swing.GroupLayout.PREFERRED_SIZE, javax.swing.GroupLayout.DEFAULT_SIZE, javax.swing.GroupLayout.PREFERRED_SIZE))
                        .addPreferredGap(javax.swing.LayoutStyle.ComponentPlacement.RELATED)
                        .addGroup(layout.createParallelGroup(javax.swing.GroupLayout.Alignment.BASELINE)
                            .addComponent(jLabel4)
                            .addComponent(jTextFieldAge, javax.swing.GroupLayout.PREFERRED_SIZE, javax.swing.GroupLayout.DEFAULT_SIZE, javax.swing.GroupLayout.PREFERRED_SIZE))
                        .addPreferredGap(javax.swing.LayoutStyle.ComponentPlacement.RELATED)
                        .addGroup(layout.createParallelGroup(javax.swing.GroupLayout.Alignment.BASELINE)
                            .addComponent(jLabel5)
                            .addComponent(jComboBox1, javax.swing.GroupLayout.PREFERRED_SIZE, javax.swing.GroupLayout.DEFAULT_SIZE, javax.swing.GroupLayout.PREFERRED_SIZE))))
                .addContainerGap(57, Short.MAX_VALUE))
        );

        pack();
    }// </editor-fold>//GEN-END:initComponents

    private void jButtonFetchDataActionPerformed(java.awt.event.ActionEvent evt) {//GEN-FIRST:event_jButtonFetchDataActionPerformed
        filltable();
    }//GEN-LAST:event_jButtonFetchDataActionPerformed
    private void jTable1MouseClicked(java.awt.event.MouseEvent evt) {//GEN-FIRST:event_jTable1MouseClicked
        // TODO add your handling code here:
        String select = jTable1.getValueAt(jTable1.getSelectedRow(), 0).toString();
        try {
            baglantiAc();
        } catch (Exception ex) {
            Logger.getLogger(DbProjectGui.class.getName()).log(Level.SEVERE, null, ex);
        }
        try {

           Statement1 = conn.prepareStatement("select * from people where id=?");
           Statement1.setString(1, select);
           ResultSet res1 = Statement1.executeQuery();
             if (res1.next()) {
                    jTextFieldName.setText(res1.getString("name"));
                    jTextFieldLName.setText(res1.getString("Lname"));
                    jTextFieldAge.setText(res1.getString("age"));
                    if (res1.getInt("sex")==0) {
                     jComboBox1.setSelectedItem("Male");
                 }else{
                    jComboBox1.setSelectedItem("Female");
                    }
             }
        } catch (SQLException ex) {
            Logger.getLogger(DbProjectGui.class.getName()).log(Level.SEVERE, null, ex);
        }


    }//GEN-LAST:event_jTable1MouseClicked

    private void jButtonDeleteActionPerformed(java.awt.event.ActionEvent evt) {//GEN-FIRST:event_jButtonDeleteActionPerformed
                  try {
            baglantiAc();
        } catch (Exception ex) {
            Logger.getLogger(DbProjectGui.class.getName()).log(Level.SEVERE, null, ex);
        }
        try {
           String select = jTable1.getValueAt(jTable1.getSelectedRow(), 0).toString();
           Statement1 = conn.prepareStatement("DELETE FROM test.people WHERE id=?");
           Statement1.setString(1, select);
           Statement1.execute();
        } catch (Exception ex) {
 String Error="Row is not selected for deleting operation.Please select data on the table.";
JOptionPane.showMessageDialog(null,Error);
        }
        filltable();
        jTextFieldName.setText("");
        jTextFieldLName.setText("");
        jTextFieldAge.setText("");

    }//GEN-LAST:event_jButtonDeleteActionPerformed

    private void jButton2UpdateActionPerformed(java.awt.event.ActionEvent evt) {//GEN-FIRST:event_jButton2UpdateActionPerformed
            try {

            baglantiAc();
        } catch (Exception ex) {
            Logger.getLogger(DbProjectGui.class.getName()).log(Level.SEVERE, null, ex);
        }
        try {
            //burada tablodan seçilen değerin değerini string olarak aldık.
           String select = jTable1.getValueAt(jTable1.getSelectedRow(), 0).toString();
           Statement1 = conn.prepareStatement("Update people SET name=?,Lname=?,age=?,sex=? where id=?");
           // burada sql e join yapmak için parametre yolladık. (id)
           Statement1.setString(5, select);
           Statement1.setString(1, jTextFieldName.getText());
           Statement1.setString(2, jTextFieldLName.getText());
           Statement1.setString(3, jTextFieldAge.getText());
           int comboboxselectedindex = jComboBox1.getSelectedIndex();
           Statement1.setString(4, String.valueOf(comboboxselectedindex));
           Statement1.execute();
        } catch (Exception ex) {
             String Error="Data is not selected for updating operation.Please select data on the table.";
JOptionPane.showMessageDialog(null,Error);
        }
                filltable();


    }//GEN-LAST:event_jButton2UpdateActionPerformed

    private void jButtonInsertActionPerformed(java.awt.event.ActionEvent evt) {//GEN-FIRST:event_jButtonInsertActionPerformed
 try {
            baglantiAc();
        } catch (Exception ex) {
            Logger.getLogger(DbProjectGui.class.getName()).log(Level.SEVERE, null, ex);
        }
        try {
           Statement1 = conn.prepareStatement("INSERT INTO people (`ID`, `name`, `Lname`, `age`, `sex`) VALUES (NULL,?,?,?,?)");
          // sql ifadesine parametreleri ekliyoruz.
           Statement1.setString(1, jTextFieldName.getText());
           Statement1.setString(2, jTextFieldLName.getText());
           Statement1.setString(3, jTextFieldAge.getText());
           int comboboxselectedindex = jComboBox1.getSelectedIndex();
           Statement1.setString(4, String.valueOf(comboboxselectedindex));
           Statement1.execute();
        }catch (Exception ex) {
 String Error="Please Fill empty TextField area.";
JOptionPane.showMessageDialog(null,Error);
        }

                filltable();

    }//GEN-LAST:event_jButtonInsertActionPerformed

    /**
     * @param args the command line arguments
     */
    public static void main(String args[]) {
        try {
            for (javax.swing.UIManager.LookAndFeelInfo info : javax.swing.UIManager.getInstalledLookAndFeels()) {
                if ("Nimbus".equals(info.getName())) {
                    javax.swing.UIManager.setLookAndFeel(info.getClassName());
                    break;
                }
            }
        } catch (ClassNotFoundException | InstantiationException | IllegalAccessException | javax.swing.UnsupportedLookAndFeelException ex) {
            java.util.logging.Logger.getLogger(DbProjectGui.class.getName()).log(java.util.logging.Level.SEVERE, null, ex);
        }
        //</editor-fold>

        /* Create and display the form */
        java.awt.EventQueue.invokeLater(new Runnable() {
            public void run() {
                new DbProjectGui().setVisible(true);
            }
        });
    }
    // Variables declaration - do not modify//GEN-BEGIN:variables
    private javax.swing.JButton jButton2Update;
    private javax.swing.JButton jButtonDelete;
    private javax.swing.JButton jButtonFetchData;
    private javax.swing.JButton jButtonInsert;
    private javax.swing.JComboBox jComboBox1;
    private javax.swing.JLabel jLabel2;
    private javax.swing.JLabel jLabel3;
    private javax.swing.JLabel jLabel4;
    private javax.swing.JLabel jLabel5;
    private javax.swing.JScrollPane jScrollPane1;
    private javax.swing.JTable jTable1;
    private javax.swing.JTextField jTextFieldAge;
    private javax.swing.JTextField jTextFieldLName;
    private javax.swing.JTextField jTextFieldName;
    // End of variables declaration//GEN-END:variables

    private void filltable() {
    try {
            baglantiAc();
        } catch (Exception ex) {
            Logger.getLogger(DbProjectGui.class.getName()).log(Level.SEVERE, null, ex);
        }
        try {
            res = command.executeQuery("select * from people");
        } catch (SQLException ex) {
            Logger.getLogger(DbProjectGui.class.getName()).log(Level.SEVERE, null, ex);
        }

                 jTable1.setModel(DbUtils.resultSetToTableModel(res));
    }

}
Kodun içerisinde bazı sql sorgularına parametre yollamamız gerekiyordu. Örneğin kişinin bilgilerini güncelleyeceksek, bu kişinin id bilgisi elimizde olması gerekiyorki database’e gönderirken o kişinin bilgilerini güncellediğimizden emin olalım.
String select = jTable1.getValueAt(jTable1.getSelectedRow(), 0).toString();
Statement1 = conn.prepareStatement("select * from people where id=?");
           Statement1.setString(1, select);
           ResultSet res1 = Statement1.executeQuery();
örneğin bu kodda string olarak tanıttığımız selectin içerisine program üzerindeki tabloda hangi kişinin üzerine tıkladıysak o kişinin id bilgisini göndermiş olduk.
jTable1.getSelectedRow() satır sayısını verir 0 değeri ise sütün oluyor. dolayısınla ilk sütünde id bilgisi olduğundan hangi kişiye tıklarsak onun id bilgisi select değişkenine yerleşmiş oluyor.
res1 objesinede bu sorgunun sonucunu atmış olduk.
Bu sorgunun ardından result setin içerisinde sütün bazında kişinin ismi, soyismi, yaşı ve cinsiyet bilgisi yerleşti. If döngüsü ile bu bilgileri textfieldlara gönderme işlemide şu şekildedir;
if (res1.next()) {
                    jTextFieldName.setText(res1.getString("name"));
                    jTextFieldLName.setText(res1.getString("Lname"));
                    jTextFieldAge.setText(res1.getString("age"));
                    if (res1.getInt("sex")==0) {
                     jComboBox1.setSelectedItem("Male");
                 }else{
                    jComboBox1.setSelectedItem("Female");
                    }
             }
Unutmadan veritabanına oluşturduğumuz people tablosunun şeması şu şekildedir;
create table people(
id int NOT NULL AUTO_INCREMENT,
name varchar(50),
Lname varchar(50),
age int,
sex int(10),
Primary key(id)
)
Program ile ilgili bazı görseller;


Programın kodları hakkında aklınıza takılan herşeyi sorabilirsiniz.
The post Java Veritabanı Projesi – Java ile Veritabanı Bağlantısı first appeared on Emre Bektaş.
]]>The post Java MsSQL Database Bağlantısı first appeared on Emre Bektaş.
]]>import java.sql.Connection;
import java.sql.DriverManager;
import java.sql.ResultSet;
import java.sql.ResultSetMetaData;
import java.sql.SQLException;
import java.sql.Statement;
public class MsSqlConnection {
public static void main(String[] args)
{
Connection connect=null;
Statement statement=null;
String Query="select * from [tablename]";
String JDBC_DRIVER = "com.microsoft.sqlserver.jdbc.SQLServerDriver";
String DATABASE_URL = "jdbc:jtds:sqlserver://youraddress;database=yourdbname;integratedSecurity=true;";
String USERNAME = "sa";
String PASSWORD = "*****";
try
{
//Driveri ekliyoruz.
Class.forName(JDBC_DRIVER);
connect=DriverManager.getConnection(DATABASE_URL,USERNAME,PASSWORD);
statement=connect.createStatement();
ResultSet result=statement.executeQuery(Query);
ResultSetMetaData metaData = result.getMetaData();
int number = metaData.getColumnCount();
for(int i=1; i<=number; i++)
System.out.printf( "%-8s\t", metaData.getColumnName( i ) );
System.out.println();
while(result.next()) {
for(int i=1; i<=number; i++)
System.out.printf("%-8s\t", result.getObject(i));
// int id = result.getInt("ID"); //if you want to fetch specitfic info use this method.
System.out.println();
}
}
catch(SQLException e)
{
e.printStackTrace();
System.exit(1);
}
catch(ClassNotFoundException e)
{
e.printStackTrace();
System.exit(1);
}
finally
{
try
{
connect.close();
statement.close();
}
catch(Exception e)
{
e.printStackTrace();
System.exit(1);
}
}
}
}
Koda baktığımızda bilmemiz gereken ayrıntı;
jdbc:jtds:sqlserver satırıdır. Buradaki jtds java ile mssql arasında sql server authentication yapmamızı sağlıyor. Linux kullanan arkadaşların işine çok yarayacaktır bu yöntem. Zira windows tarafında windows authentication dosyasınıda projenize eklemeniz gerekiyor native library olarak. Ek olarak sql server authentication yapmak istiyorsak sql serverdan bu ayarı aktifleştirmek gerekiyor. Sql serverdan bağlı olduğunuz datasenin üzerine gelerek sağ tıklayıp properties seçeneğine girin ardından;
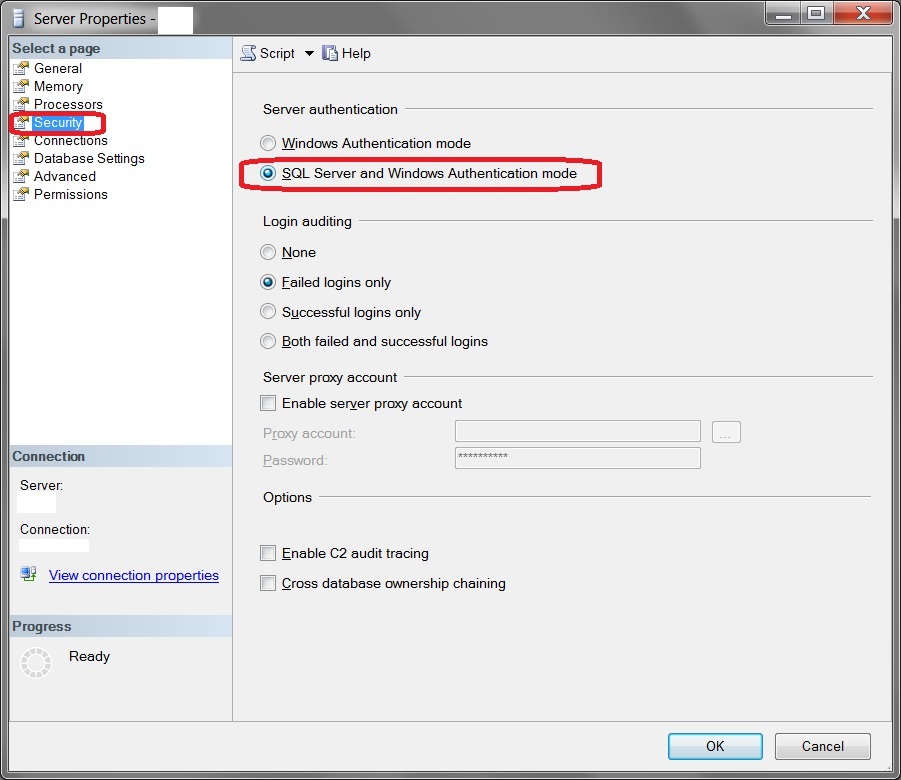
Bu ayarı etkinleştirmeniz gerekiyor.
Windows üzerinden java programlıyorsanız kodu jdbc:sqlserver olarak değiştirebilirsiniz. bu şekilde çalıştırmak isterseniz sql server authentication ile uğraşmanıza gerek yoktur.
http://www.microsoft.com/en-us/download/details.aspx?displaylang=en&id=11774 adresinden kütüphaneyi indirip işletim sistemi türünüze göre sqljdbc_auth.dll dosyasını projenize nativa library olarak eklemeniz gerekmektedir.
[su_button url=”https://drive.google.com/file/d/0Bypgi5nv-lAOMGxNNEhDYkpGY1U/” target=”blank” style=”3d”]Download[/su_button]
The post Java MsSQL Database Bağlantısı first appeared on Emre Bektaş.
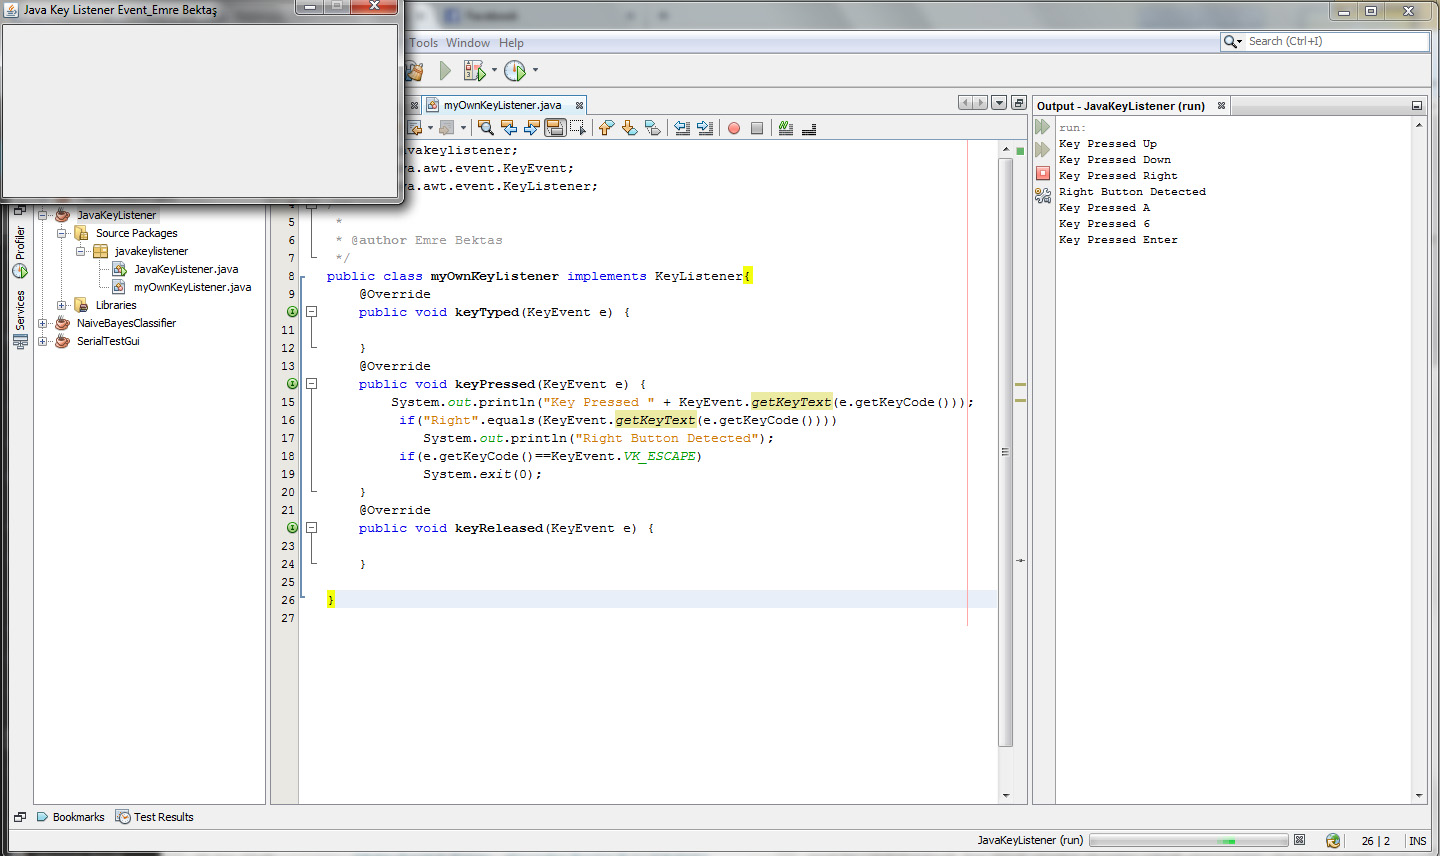
]]>The post Java ile Klavyeden Basılan Tuşu Algılama – Java Key Listener first appeared on Emre Bektaş.
]]>JavaKeyListener.java
package javakeylistener;
import javax.swing.JFrame;
/**
 *
 * @author Emre Bektas
 */
public class JavaKeyListener {
    public static void main(String[] args) {
        myOwnKeyListener klavye = new myOwnKeyListener();
        JFrame frame = new JFrame();
        frame.setTitle("Java Key Listener Event_Emre Bektaş");
        frame.setSize(400, 200);
        frame.setResizable(false);
        frame.setDefaultCloseOperation(JFrame.EXIT_ON_CLOSE);
        frame.addKeyListener(klavye);
        frame.setVisible(true);
    }
}
Bu dosyada Jframe objesinden frame nesnesi türettik ve bazı attributelerine erişerek değerler girdik.
myOwnKeyListener.java
package javakeylistener;
import java.awt.event.KeyEvent;
import java.awt.event.KeyListener;
/**
 *
 * @author Emre Bektas
 */
public class myOwnKeyListener implements KeyListener{
    @Override
    public void keyTyped(KeyEvent e) {

    }
    @Override
    public void keyPressed(KeyEvent e) {
        System.out.println("Key Pressed " + KeyEvent.getKeyText(e.getKeyCode()));
         if("Right".equals(KeyEvent.getKeyText(e.getKeyCode())))
            System.out.println("Right Button Detected");
         if(e.getKeyCode()==KeyEvent.VK_ESCAPE)
            System.exit(0);
    }
    @Override
    public void keyReleased(KeyEvent e) {

    }

}
Eclipse projesini aşağıdaki linkten indirebilirsiniz…
[su_button url=”https://drive.google.com/open?id=0Bypgi5nv-lAOT2d0enNGTW05N2c” target=”blank” style=”3d”]Download[/su_button]
The post Java ile Klavyeden Basılan Tuşu Algılama – Java Key Listener first appeared on Emre Bektaş.
]]>The post Arduino ile Java’nın Seri Port Üzerinden Haberleşmesi first appeared on Emre Bektaş.
]]>Merhaba arkadaşlar bu yazımda sizlere Java programlama dili ile seri port üzerinden arduino ile nasıl haberleşebileceğimizi göstereceğim. Aslında hali hazırda arduino’nun resmi sitesinde kodu bulunmaktadır fakat bu kodda sadece serial read işlemleri yapılıyor seri porta değer yazmıyor. Benim yazdığım kodda ise Seri port üzerinden arduino’ya değer gönderiyoruz ve değeri okuyabiliriyoruz.
import java.io.BufferedReader;
import java.io.IOException;
import java.io.InputStreamReader;
import java.io.OutputStream;
import gnu.io.CommPortIdentifier;
import gnu.io.SerialPort;
import gnu.io.SerialPortEvent;
import gnu.io.SerialPortEventListener;
import java.util.Enumeration;

public class SerialTest implements SerialPortEventListener {
	SerialPort serialPort;
        /** The port we're normally going to use. */
	private static final String PORT_NAMES[] = {
		//	"/dev/tty.usbserial-A9007UX1", // Mac OS X
          //              "/dev/ttyACM0", // Raspberry Pi
		//	"/dev/ttyUSB0", // Linux
			"COM5", // Windows
	};
	/**
* A BufferedReader which will be fed by a InputStreamReader
	* converting the bytes into characters
	* making the displayed results codepage independent
	*/
	private BufferedReader input;
	/** The output stream to the port */
	private static OutputStream output;
	/** Milliseconds to block while waiting for port open */
	private static final int TIME_OUT = 2000;
	/** Default bits per second for COM port. */
	private static final int DATA_RATE = 9600;

	public void initialize() {
                // the next line is for Raspberry Pi and
                // gets us into the while loop and was suggested here was suggested http://www.raspberrypi.org/phpBB3/viewtopic.php?f=81&t=32186
                System.setProperty("gnu.io.rxtx.SerialPorts", "COM5");

		CommPortIdentifier portId = null;
		Enumeration portEnum = CommPortIdentifier.getPortIdentifiers();

		//First, Find an instance of serial port as set in PORT_NAMES.
		while (portEnum.hasMoreElements()) {
			CommPortIdentifier currPortId = (CommPortIdentifier) portEnum.nextElement();
			for (String portName : PORT_NAMES) {
				if (currPortId.getName().equals(portName)) {
					portId = currPortId;
					break;
				}
			}
		}
		if (portId == null) {
			System.out.println("Could not find COM port.");
			return;
		}

		try {
			// open serial port, and use class name for the appName.
			serialPort = (SerialPort) portId.open(this.getClass().getName(),
					TIME_OUT);

			// set port parameters
			serialPort.setSerialPortParams(DATA_RATE,
					SerialPort.DATABITS_8,
					SerialPort.STOPBITS_1,
					SerialPort.PARITY_NONE);

			// open the streams
			input = new BufferedReader(new InputStreamReader(serialPort.getInputStream()));
			output = serialPort.getOutputStream();

			// add event listeners
			serialPort.addEventListener(this);
			serialPort.notifyOnDataAvailable(true);
		} catch (Exception e) {
			System.err.println(e.toString());
		}
	}

	/**
	 * This should be called when you stop using the port.
	 * This will prevent port locking on platforms like Linux.
	 */
	public synchronized void close() {
		if (serialPort != null) {
			serialPort.removeEventListener();
			serialPort.close();
		}
	}

	/**
	 * Handle an event on the serial port. Read the data and print it.
	 */
	public synchronized void serialEvent(SerialPortEvent oEvent) {
		if (oEvent.getEventType() == SerialPortEvent.DATA_AVAILABLE) {
			try {
				String inputLine=input.readLine();
				System.out.println(inputLine);
			} catch (Exception e) {
				System.err.println(e.toString());
			}
		}
		// Ignore all the other eventTypes, but you should consider the other ones.
	}
	public static void main(String[] args) throws Exception {
		SerialTest main = new SerialTest();
		main.initialize();
		Thread t=new Thread() {
			public void run() {
				//the following line will keep this app alive for 1000 seconds,
				//waiting for events to occur and responding to them (printing incoming messages to console).
				try {Thread.sleep(1000000);} catch (InterruptedException ie) {}
			}
		};
		t.start();
                System.out.println("Resetting and Starting Arduino");
                Thread.sleep(3000);
		System.out.println("Connection Started");
		try{
			String command = "emre bektas.com\n";
			char[] char_array = command.toCharArray();
			Thread.sleep(100); // veri göndermeden önce bu thread gerekiyor.
				for (int i = 0; i < char_array.length; i++) {
					output.write(char_array[i]);
				}
			Thread.sleep(100); // connection kapatmadan önce bu thread gerekiyor.
			} catch(IOException ioe) {
			ioe.printStackTrace();
			} catch(InterruptedException ie) {
			ie.printStackTrace();
			}
		main.close(); // connection u kapattık. eğer sürekli veri gönderilip alınacaksa bu komut kaldırılmalı.
		System.out.println("Connection Closed");
	}


}
Ek olarak java’nın serialport kütüphanesini kullanabilmeniz için projenize txrxcommunication kütüphanesini eklemeniz ve rar dosyasının içindeki win 32 ve win 64 işletim sisteminiz kaç bit ise içerisindeki rxtxSerial.dll dosyasını C:\Windows klasörüne atmanız gerekmektedir. Eğer Netbeans kullanıyorsanız windows klasörüne dll dosyasınız atmanız gerekebilir fakat eclipsede sadece RXTXcomm-2.2pre2.jar dosyasını projeye import etmem yetti.Dosyaları ekten indirebilirsiniz…
Eğerki her defasında jar dosyasını projenize eklemek istemiyorsanız c:\Program Files\Java\kullandıgınızjava\lib\ext klasörün e RXTXcomm-2.2pre2 dosyasını kopyalayınız…

[su_button url=”https://drive.google.com/file/d/0Bypgi5nv-lAOQldKLW9Kenp0dkU/” target=”blank” style=”3d”]Download[/su_button]
The post Arduino ile Java’nın Seri Port Üzerinden Haberleşmesi first appeared on Emre Bektaş.
]]>The post Java ile Ortanca Sayıyı Bulma Kodu first appeared on Emre Bektaş.
]]>
package www.emrebektas.com;
import java.util.Scanner;
public class emrebektas {
	public static void main(String[] args) {

		Scanner input = new Scanner(System.in);
	       int x,y,z;
	       System.out.println("1. sayiyi giriniz...");
	       x=input.nextInt();
	       System.out.println("2. sayiyi giriniz...");
	       y=input.nextInt();
	       System.out.println("3. sayiyi giriniz...");
	       z=input.nextInt();
	       if(y>x && y<z || y>z && y<x)
	       System.out.println("Ortanca Sayi =" + y);
	       if(x>y && x<z || x>z && x<y)
	       System.out.println("Ortanca Sayi =" + x);
	       if(z>x && z<y || z>y && z<x )
	       System.out.println("Ortanca Sayi =" + z);

	}
}
The post Java ile Ortanca Sayıyı Bulma Kodu first appeared on Emre Bektaş.
]]>The post Java Mysql Database Bağlantısı first appeared on Emre Bektaş.
]]>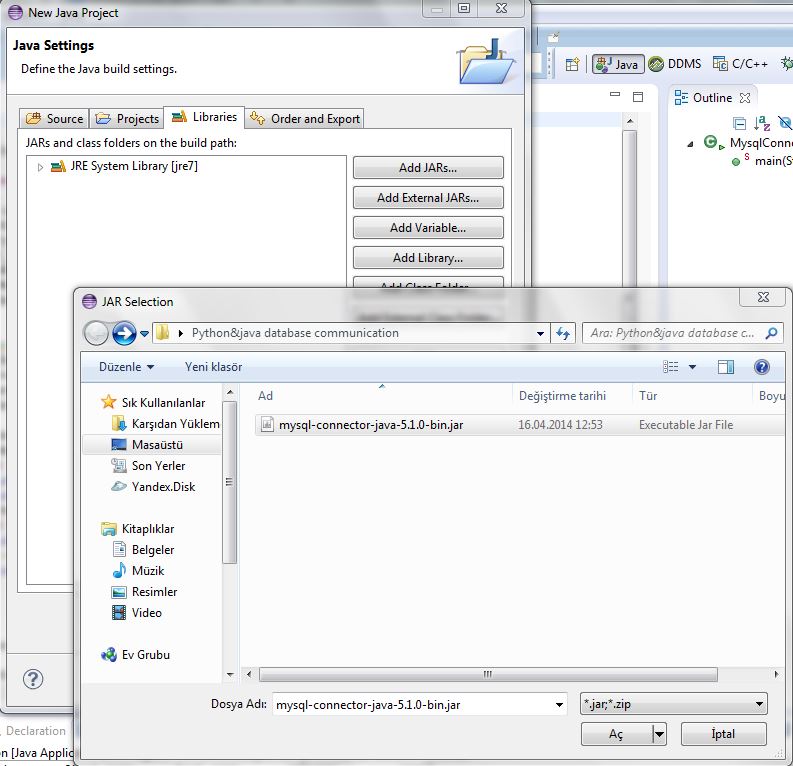
Connectoru ekledikten sonra projemizin src klasörünün içine class ekleyip kodu kullanabiliriz. Benim classımın ismi “MysqlConnection” .
import java.sql.*;

public class MysqlConnection {

    public static void main(String[] args)
    {
        Connection connect=null;
        Statement statement=null;
        String Query="You should write your query";
        String JDBC_DRIVER = "com.mysql.jdbc.Driver";
        String DATABASE_URL = "jdbc:mysql://This is your db address such as:localhost/dbname";
        String USERNAME = "db username";
        String PASSWORD = "db pass";
        try
        {
            //Driveri ekliyoruz.
            Class.forName(JDBC_DRIVER);
            connect=DriverManager.getConnection(DATABASE_URL,USERNAME,PASSWORD);
            statement=connect.createStatement();
            ResultSet result=statement.executeQuery(Query);

            ResultSetMetaData metaData = result.getMetaData();
            int number = metaData.getColumnCount();
            for(int i=1; i<=number; i++)
            System.out.printf( "%-8s\t", metaData.getColumnName( i ) );
            System.out.println();
            while(result.next()) {
            for(int i=1; i<=number; i++)
            System.out.printf("%-8s\t", result.getObject(i));
       //   int id = result.getInt("ID"); //if you want to fetch specific info use this method.
            System.out.println();

            }
        }

        catch(SQLException e)
        {
            e.printStackTrace();
            System.exit(1);
        }
        catch(ClassNotFoundException e)
        {
            e.printStackTrace();
            System.exit(1);
        }
        finally
        {
            try
            {
            	connect.close();
                statement.close();
            }
            catch(Exception e)
            {
                e.printStackTrace();
                System.exit(1);
            }
        }
    }
}
Query= “Bu bölüme sorgunuzu yazmalısınız.”
JDBC_DRIVER = “com.mysql.jdbc.Driver”;
DATABASE_URL = “jdbc:mysql://buraya dbnin bulunduğu adres gelecek örneğin:localhost/dbadi”;
USERNAME = “veritabanı kullanıcı adınız.”
PASSWORD = “veritabanı şifreniz.”
Kodu kendi ihtiyacınıza göre düzenleyip kullanabilirsiniz. Ek olarak sizlere örnek olarak mysqlde tablo oluşturup örnek bir select uygulaması yapacağım.
Mysql tablomuzun yapısı:
create table Users (
  id int unsigned auto_increment not null,
  password int,
  first_name varchar(32) not null,
  last_name varchar(32) not null,
  webpage varchar(20) not null,
  email varchar(32),
  phone varchar(15),
  primary key (id)
);
Tablo içerisine 2 adet veri yükledim ve mysql üzerinden select attığım zaman sonucu aşağıdaki gibidir.
Sorgumuz: select * from Users

Aynı select’i yazdığımız java koduna uyarladığımızda çıkan sonuç :
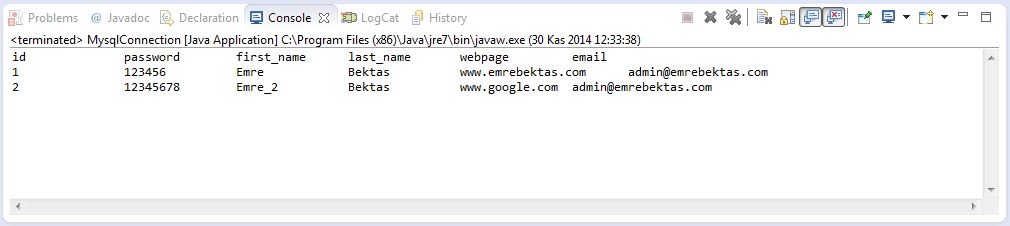
Gördüğünüz gibi programımızda herhangi bir kayıp yaşanmamaktadır. Satır ve sütün bilgilerini doğru bir şekilde çekebildik.
[su_button url=”https://drive.google.com/file/d/0Bypgi5nv-lAOS3FVbjBPNzlFZ1E/” target=”blank” style=”3d”]Download[/su_button]
The post Java Mysql Database Bağlantısı first appeared on Emre Bektaş.
]]>